


Table of contents
Introduction
Amazon Elastic Block Store (EBS) is a scalable block storage service that allows you to attach persistent storage volumes to EC2 instances. EBS volumes are highly available and reliable, providing the necessary storage for your applications.
In this article guide, we will learn how to extend, attach, and mount EBS volumes to EC2 instances and much more.
How to launch EC2 instance and EBS volume
Amazon Elastic Compute Cloud (EC2) allows you to quickly deploy virtual servers in the cloud with a root volume, while you can also extend the volume by adding more, usually called data volume or whatever terms you give it.
Let's follow these steps to launch our EC2 instance and EBS data volume:
- In the AWS Management Console search bar, enter EC2, and click the EC2 result under Services:

2. To begin configuring a new instance, in the Launch instance section, click Launch instance:

A form page titled Launch an instance will load.
3. To configure your instance, enter and select the following, leave the other fields not specified at their defaults;
Key pair (login):
- Key pair name: Create a new one and select. Don't forget to keep the downloaded file safe, as the information is very important
Configure storage:
Here you specify the root volume size and add the additional EBS volumes. This will automatically attach and mount the EBS volumes to the instance, we will cover more on this in the next section.
Select gp2 for the Root volume
Click Add new volume and enter and select:
1x: 16
GiB: Select gp2

Note: You must select gp2 for both volumes. If you do not, your instance will fail to launch.
4. To launch your instance, in the right-hand Summary section, click Launch instance:
You will be redirected to a page showing the progress of the instance's launching. Momentarily, you will see a green notification that your instance has been launched:
5. Next, navigate to the instances list page, and click View all instances:
You will see your Amazon EC2 instance listed in the Instances table. Initially, you will see the instance state report Pending. After approximately a minute, you will see it report Running. To view details of your instance, select it in the list
6. To view networking information, click the Networking tab:
8. Locate the Availability zone field and make a note of its value (you will need to use this when creating a volume later in the lab.)
How to rename Elastic Block Storage (EBS) Volume
Now, you are ready to explore the Elastic Block Store section of the EC2 service. First, view and rename the two volumes created during the launch of the EC2 instance. In the left-hand menu, under Elastic Block Store, click Volumes:
All EBS volumes are listed here. You can
check their statuses,
attach or detach them to or from the available EC2 instances, or
destroy them.
It is recommended to give your volumes meaningful descriptions to help make managing and maintaining your volume resources easier. To name your EBS, hover your mouse over the Name field for the 8 GiB volume and click the pencil icon:
Enter the desired name for both and save each:

How to create Elastic Block Storage (EBS)
In this step, you will create a new EBS volume using the Amazon EC2 Console.
Note: Remember to use the least amount of volume required for your solution; you can also modify to increase at any time.
1. To begin creating a new volume, in the top-right, click Create volume:

A form page titled Create Volume will load.
The page shows you a simple form where you can select the
volume type
volume size.
It shows the Availability Zone (where the volume will be created) and an optional snapshot image (to be restored after the creation process and if the disk data should be encrypted, you will see how to create a snapshot soon.
2. To configure your volume, enter and select the following:
Note: It is important to choose the size and type listed below when launching your EBS volume.
Volume Type: General purpose SSD (GP2)
Size: 10 GiB
Availability Zone: Select the same availability zone that matches the instance you created

3. To create your volume, at the bottom, click Create volume:
You will be returned to the Volumes page and you will see your volume with the Volume state reporting Creating.
4. Wait until the Volume state is Available:
Note: You can click the refresh icon to see the latest state of your volume:

Congratulations, you have created a new EBS volume, but to use a new EBS volume, you must attach it to one of the available EC2 instances, let's see that next.
How to attach and detach EBS volume
In this step, you will attach and detach the new volume to an EC2 instance.
1. You can attach an available volume by right-clicking on it and selecting the actions button at the top left corner, and there you will see the Attach volume:
2. Select the only EC2 instance from the drop-down menu, and click Attach volume:

You will be returned to the Volumes page, and you will see your volume's Volume state report, In-use.
Note: If you do not see the state change to In-use, wait a minute and click the refresh icon.
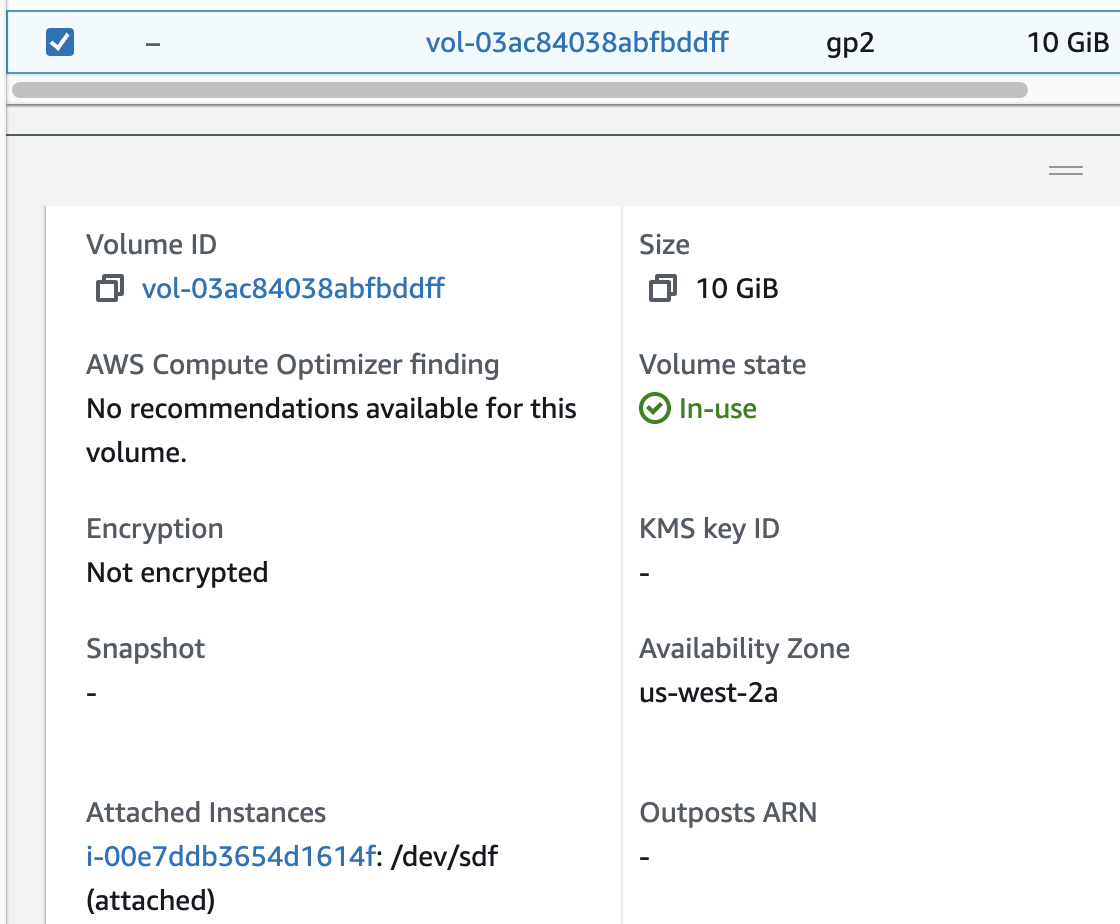
3. To view details of your volume, select it in the list
You can see the volume attached, and your new EBS volume will be ready for formatting and data storage.
4. To detach the volume, right-click on the volume and select the Detach volume action:
Note: If the "Detach volume" option appears grayed out, please wait for a moment and refresh the page before attempting again. There might be a delay after attaching a volume before you can detach it.
You have two ways to detach an Amazon EBS volume from an instance:
Explicitly detaching it.
Terminating the instance.
However:
If the instance that the volume is attached to is currently running, you need to unmount the volume from the instance before detaching it.
If the Amazon EBS volume serves as the main storage for an instance, you must stop the instance before detaching the volume.
How to create, format, and mount a volume (EBS)
When you make a new Elastic Block Store (EBS) volume, it gets storage space without assuming what kind of file system it should use. It doesn't guess if the operating system is Linux or Windows. Before you can save any data on it, you need to set up the drive with a particular file system.
Here, you will learn how to create, format, and mount an attached volume to an ec2 instance.
First, you need to connect to your EC2 instance either through SSH or through EC2 Instance Connect, which is easier.
- Navigate to your instances and select the one you created earlier. Click the Connect button at the top right corner. This shows you a screen as below; scroll down (ensure you are under the EC2 Instance Connect tab) and click Connect.

- Once connected inside the instance terminal, enter the following command to list all your disks:
lsblk
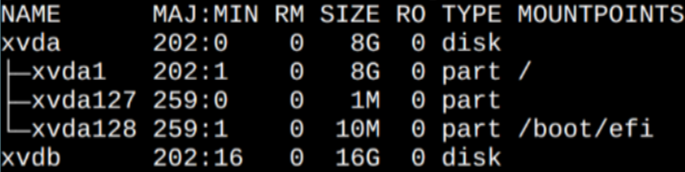
As you can see there is a mounted volume with its partition. That is your root disk, the other one is the disk to mount. Take note of its name, in this example it is xvdb.
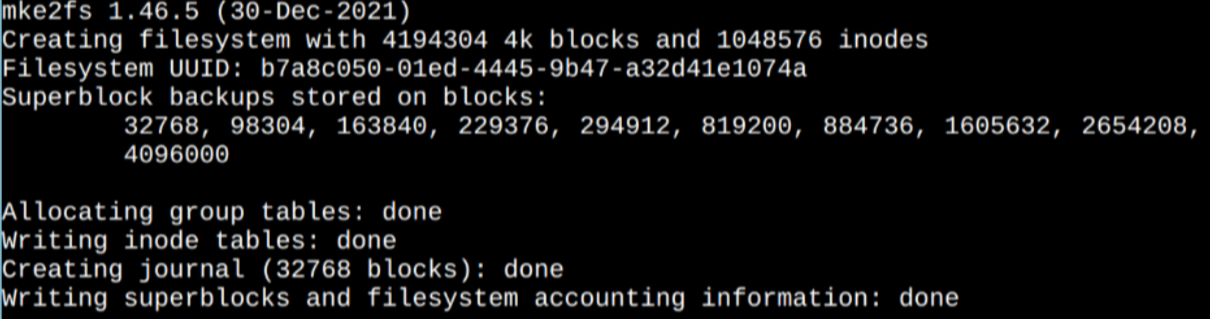
2. Issue the following command to create an ext4 filesystem on the new volume:
sudo mkfs -t ext4 /dev/xvdb
3. Create the directory where you wish to mount the new volume.
sudo mkdir /mnt/ebs-store
4. Mount the new volume:
sudo mount /dev/xvdb /mnt/ebs-store
5. To configure the Linux instance to mount this volume on boot, open the /etc/fstab file in an editor with the following command:
sudo nano /etc/fstab
6. Append the following line to the end of /etc/fstab:
/dev/xvdb /mnt/ebs-store ext4 defaults,noatime 1 2

7. In the text editor, hit Ctrl+O, hit enter to save, and then Ctrl+X to exit the editor.
8. Enter the following command to see your device mounted to /mnt/ebs-store:
lsblk
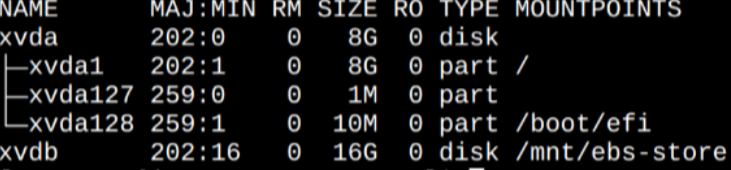
Congratulations! You have successfully mounted the volume created and attached to your instance from the EC2 console.
- To unmount the volume in Linux, use the following command in the terminal:
sudo umount -d /mnt/ebs-store/
How to create EBS Snapshots
After saving data to an Amazon EBS volume, you can make a snapshot of it for backup or to create new volumes. These snapshots are efficient, as they only save the changes since the last snapshot. Although you save snapshots incrementally, you only need to keep the latest one to restore the volume.
Snapshots happen in the background, and their status is "pending" until they're done.
You can snapshot a volume that's currently being used. However, it captures only the data written to the volume when the snapshot is initiated. If you can stop writing files temporarily, the snapshot should be complete. But if you can't pause writing, unmount the volume, take the snapshot, and then remount it for a consistent snapshot. You can keep using the volume while the snapshot is in progress.
For root device volumes, it's advisable to stop the instance before creating a snapshot.
In this step, you will create an EBS snapshot.
Instructions
2. To navigate to the snapshots page, in the left-hand menu of the Amazon EC2 console, under Elastic Block Store, click Snapshots:
3. To begin creating a snapshot, in the top-right, click Create snapshot:

A form page titled Create snapshot will load.
4. To configure your snapshot, in the Volume ID dropdown, select the unnamed volume you created:

5. To create your snapshot, at the bottom of the page, click Create snapshot.
6. To restore data from the snapshot, locate the desired snapshot from the Snapshots Console, right-click, and select Create volume from snapshot:

7. Set the following values, leaving the remaining defaults, and click Create Volume:
Volume type: gp2
Size: 10 GiB
Availability zone: us-west-2a
8. Once you've recovered the data onto a fresh volume, you can connect it to an instance and set up the storage following the earlier instructions. As the new volume already contains data, there's no need to establish a new file system (like using 'mkfs' in Linux). Just mount the volume (in Linux) and begin using the existing file system and data.
Additional Resources:
Conclusion
In conclusion, effective management of Amazon EC2 instances and Elastic Block Store (EBS) volumes is essential for optimizing performance, ensuring data durability, and adapting to evolving storage needs.
We covered key aspects such as launching EC2 instances, creating and attaching EBS volumes, and best practices for lifecycle management. Additionally, understanding EBS types, performance optimization, and troubleshooting common issues contribute to a robust and reliable AWS infrastructure.
By following these guidelines, users can harness the full potential of EC2 instances and EBS volumes, creating a resilient and scalable foundation for their cloud-based applications.