

Introduction
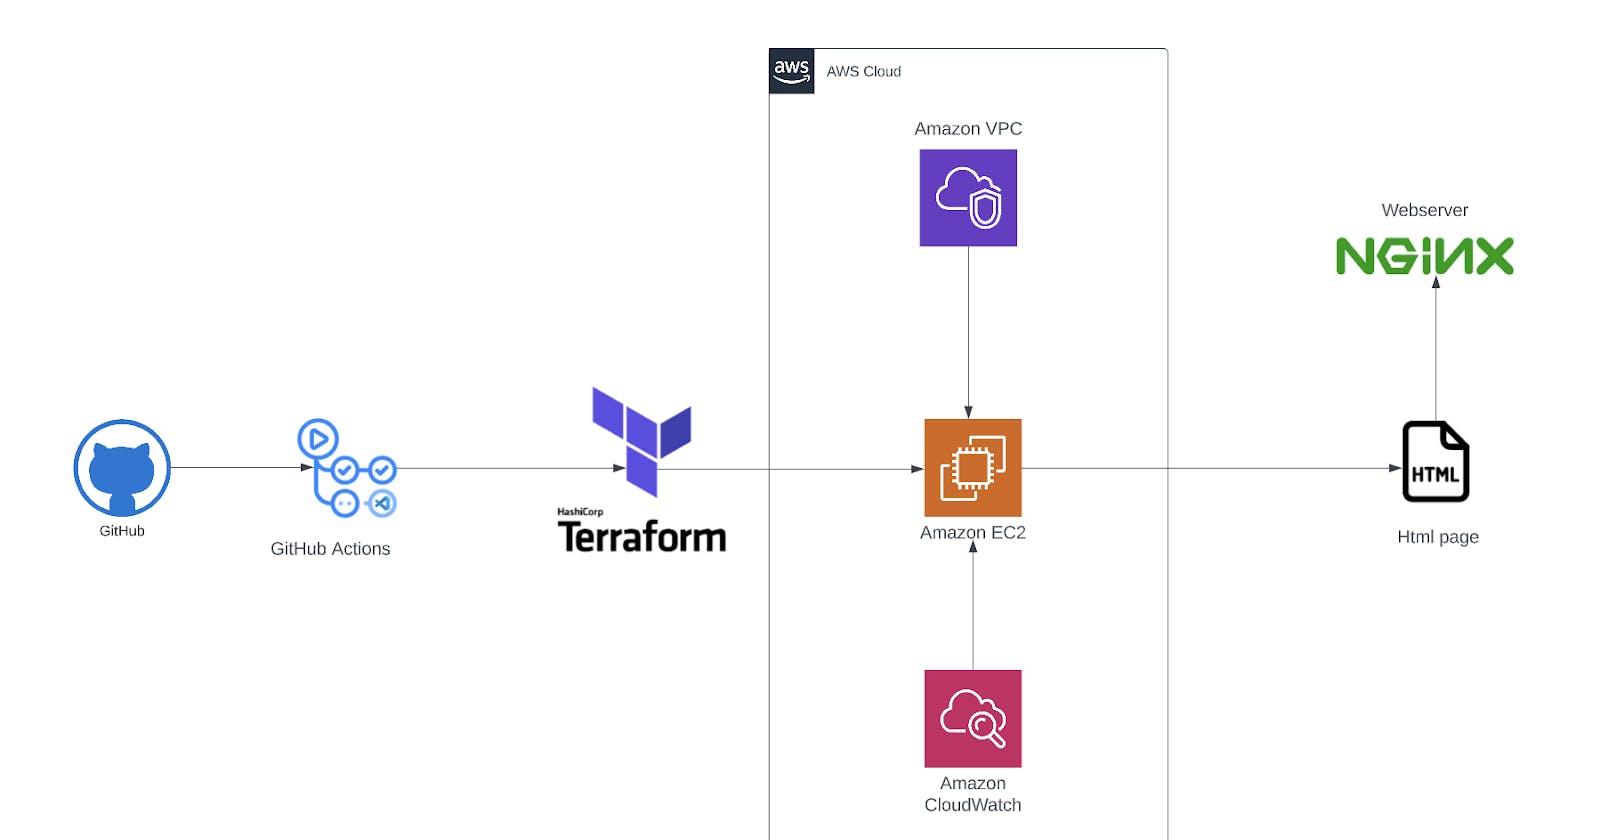
This is a step-by-step guide on how to create a web server on AWS using Terraform. In this tutorial, we will walk through the process of provisioning a virtual private cloud (VPC) with public and private subnets, setting up an internet gateway, and deploying an Nginx web server in the public subnet. Additionally, we will configure the necessary security groups, route tables, and a NAT gateway to ensure secure and efficient communication within the VPC.
This guide is designed to provide you with a solid foundation in deploying infrastructure using Terraform. It serves as a practical example to help you understand key concepts and best practices in infrastructure as code. If you're looking to expand your knowledge further and explore more advanced topics in infrastructure as code, I encourage you to check out my other article titled "Learn Infrastructure as Code by Building a Custom Machine Image in AWS" on FreeCodeCamp. It delves deeper into Terraform and demonstrates how to build custom machine images in the AWS environment.
Prerequisites
Before you begin, ensure you have the following:
Basic Knowledge of Terraform commands.
How to configure terraform backend state
To store the Terraform state, we'll configure a backend to use an S3 bucket. Add the following configuration to your Terraform file:
terraform {
  backend "s3" {
    bucket  = "team-warriors-web-server-backend-state"
    key     = "team-warriors-web-server/development/terraform.tfstate"
    region  = "eu-west-1"
    encrypt = true
  }
  required_providers {
    aws = {
      source  = "hashicorp/aws"
      version = "~> 4.0"
    }
  }
}
How to Set Up VPC and Networking Topology
How to Create AWS VPC with Terraform
A Virtual Private Cloud (VPC) is a logically isolated network within AWS. Let's create a VPC with the following configuration:
resource "aws_vpc" "main_vpc" {
  cidr_block           = var.cidr_block
  enable_dns_support   = true
  enable_dns_hostnames = true
  tags = {
    Name = "${var.env_prefix}-main_vpc"
  }
}

How to Create AWS Internet Gateway with Terraform
An internet gateway enables communication between instances in your VPC and the internet. Let's create an internet gateway:
"aws_internet_gateway" "igw" {
  vpc_id = var.vpc_id

  tags = {
    Name = "${var.env_prefix}-web-server-igw"
  }
}

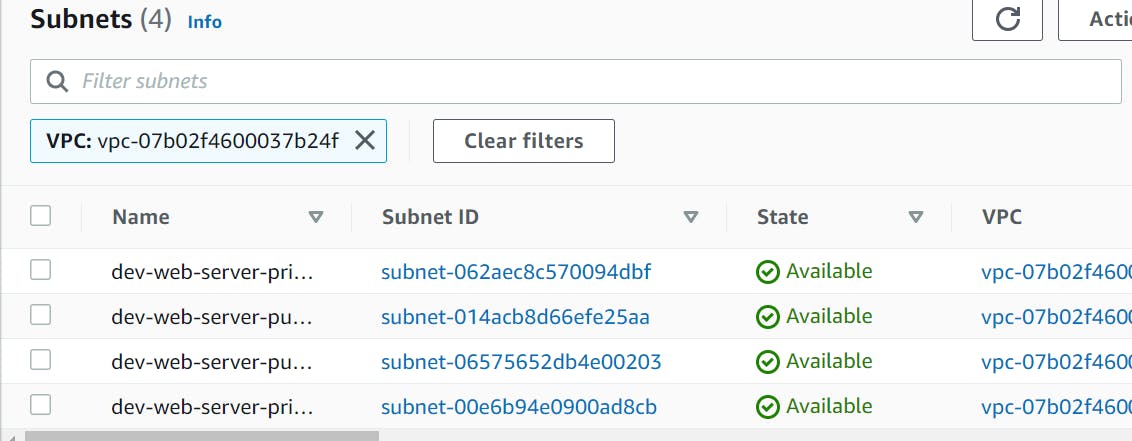
How to Create AWS Public Subnets with Terraform
Public subnets are used to launch resources that require a public IP address. Let's create public subnets:
"aws_subnet" "public_subnets" {
  vpc_id                  = var.vpc_id
  cidr_block              = cidrsubnet(var.vpc_cidr_block, 8, 2 + count.index)
  availability_zone       = element(var.availability_zones, count.index)
  map_public_ip_on_launch = "true"
  count                   = var.public_subnets_count

  tags = {
    Name = "${var.env_prefix}-web-server-public-subnet"
  }
}
How to Create AWS Private Subnets with Terraform
Private subnets are used for resources that don't require a public IP address. Let's create private subnets:
"aws_subnet" "private_subnets" {
  vpc_id                  = var.vpc_id
  cidr_block              = cidrsubnet(var.vpc_cidr_block, 8, count.index)
  availability_zone       = element(var.availability_zones, count.index)
  map_public_ip_on_launch = false
  count                   = var.private_subnets_count

  tags = {
    Name = "${var.env_prefix}-web-server-private-subnet"
  }
}
How to Create a route table and Associate Subnets with Terraform
A route table is needed to allow subnets to access the internet. Let's create a route table and associate the subnets:
"aws_route_table" "public_rt" {
  vpc_id = var.vpc_id

  route {
    cidr_block = "0.0.0.0/0"
    gateway_id = var.internet_gateway_id
  }

  tags = {
    Name = "${var.env_prefix}-web-server-public-rt"
  }
}

resource "aws_route_table_association" "public" {
  count          = var.public_subnets_count
  subnet_id      = element(var.public_subnets.*.id, count.index)
  route_table_id = aws_route_table.public_rt.id
}

How to Create AWS NAT Gateway with Terraform
A NAT gateway allows instances in private subnets to access the internet. Let's create a NAT gateway:
"aws_eip" "eip_for_the_nat_gateway" {
  vpc = true

  tags = {
    Name = "${var.env_prefix}-web-server-eip-for-the-nat-gateway"
  }
}

resource "aws_nat_gateway" "nat_gateway" {
  allocation_id = aws_eip.eip_for_the_nat_gateway.id
  subnet_id     = element(var.public_subnets.*.id, 0)

  tags = {
    Name = "${var.env_prefix}-web-server-nat-gateway"
  }
}

How to Provision an AWS Compute Service
How to Create AWS Security Group with Terraform
A security group allows traffic to reach the web server. Let's create a security group to allow ports 22 (SSH), 80 (HTTP), and 443 (HTTPS):
"aws_security_group" "allow-web-security-group" {
  vpc_id      = var.vpc_id
  description = "Allow web inbound traffic"
  name        = "allows_web_traffic"

  ingress {
    from_port       = "22"
    to_port         = "22"
    protocol        = "tcp"
    security_groups = [aws_security_group.bastion.id]
  }

  ingress {
    description = "HTTPS in public subnet"
    from_port   = 443
    to_port     = 443
    protocol    = "tcp"
    cidr_blocks = ["0.0.0.0/0"]
  }

  ingress {
    description = "HTTPS in public subnet"
    from_port   = 80
    to_port     = 80
    protocol    = "tcp"
    cidr_blocks = ["0.0.0.0/0"]
  }

  egress {
    from_port   = 0
    to_port     = 0
    protocol    = "-1" # all protocols
    cidr_blocks = ["0.0.0.0/0"]
  }

  tags = {
    Name = "allow-web"
  }
}

How to Create AWS key pair with Terraform
To establish SSH access to the instances, we'll create a key pair:
"aws_key_pair" "bastion" {
  key_name   = "bastion-key"
  public_key = file(var.public_key_path)
}

How to Create Compute Instances (EC2) with Terraform
Finally, let's create the EC2 instances for the web server and bastion:
hashicorpCopy codedata "aws_ami" "latest-amazon-linux-image" {
  most_recent = true
  owners      = ["amazon"]

  filter {
    name   = "name"
    values = ["amzn-ami-hvm-*-x86_64-gp2"]
  }
}

resource "aws_instance" "nginx-instance" {
  ami                    = data.aws_ami.latest-amazon-linux-image.value
  instance_type          = "t2.micro"
  key_name               = aws_key_pair.ngnix-server-key-pair.key_name
  vpc_security_group_ids = [var.security_group_allow_web]
  subnet_id              = element(var.public_subnets, 0).id

  user_data = file("./userdata/ngnix-server-script.sh")

  tags = {
    Name = "${var.env_prefix}-nginx-instance"
  }
}

How to Create CICD with Github Actions
Furthermore, to enhance your deployment workflow and automate the infrastructure provisioning process, we will be using GitHub Actions. GitHub Actions is a powerful CI/CD platform that allows you to define workflows and automate tasks directly within your GitHub repository. The code snippet below showcases the GitHub Actions workflow for Terraform:
name: Terraform

on:
  push:
    branches:
      - main
      - Github-actions
  pull_request:

jobs:
  terraform:
    name: Terraform
    runs-on: ubuntu-latest
    env:
      AWS_ACCESS_KEY_ID: ${{secrets.AWS_ACCESS_KEY_ID}}
      AWS_SECRET_ACCESS_KEY: ${{secrets.AWS_SECRET_ACCESS_KEY}}
      AWS_REGION: "eu-west-1"
      CONFIG_DIRECTORY: "./"

    steps:
      - name: Checkout
        uses: actions/checkout@v2

      - name: Terraform Format
        id: fmt
        run: terraform fmt -check

      - name: Terraform Init
        id: init
        run: terraform init

      - name: Terraform Validate
        id: validate
        run: terraform validate -no-color

      - name: Terraform Plan
        id: plan
        if: github.event_name == 'pull_request'
        run: terraform plan -no-color
        continue-on-error: true

      - uses: actions/github-script@0.9.0
        if: github.event_name == 'pull_request'
        env:
          PLAN: "terraform\n${{ steps.plan.outputs.stdout }}"
        with:
          github-token: ${{ secrets.GITHUB_TOKEN }}
          script: |
            const output = `#### Terraform Format and Style 🖌\`${{ steps.fmt.outcome }}\`
            #### Terraform Initialization ⚙️\`${{ steps.init.outcome }}\`
            #### Terraform Validation 🤖\`${{ steps.validate.outcome }}\`
            #### Terraform Plan 📖\`${{ steps.plan.outcome }}\`

            <details><summary>Show Plan</summary>

            \`\`\`\n
            ${process.env.PLAN}
            \`\`\`

            </details>

            *Pusher: @${{ github.actor }}, Action: \`${{ github.event_name }}\`*`;

            github.issues.createComment({
              issue_number: context.issue.number,
              owner: context.repo.owner,
              repo: context.repo.repo,
              body: output
            })

      - name: Terraform Plan Status
        if: steps.plan.outcome == 'failure'
        run: exit 1

      - name: Terraform Apply
        if: github.ref == 'refs/heads/main' && github.event_name == 'push'
        run: terraform apply -auto-approve
Feel free to incorporate this workflow into your project, which will enable you to automate the provisioning process of your infrastructure using Terraform.
For a comprehensive understanding of CI/CD pipelines and to explore different deployment strategies, including continuous integration, continuous delivery, and continuous deployment, you can refer to my blog post titled "How to Create a CI/CD Pipeline". It provides valuable insights into building robust and efficient CI/CD workflows.
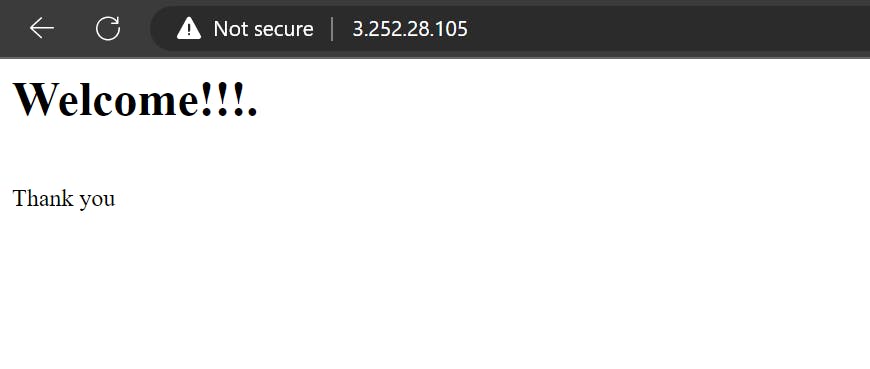
Server test
Conclusion
In this article, we walk through the process of setting up an Nginx web server on AWS using Terraform. We covered the creation of a VPC, subnets, internet and NAT gateways, security groups, and EC2 instances. Also automating it with GitHub actions. With this setup, you now have a scalable and secure web server infrastructure on AWS.
Remember to destroy the resources when they are no longer needed to avoid incurring unnecessary costs.
Project Source
This article is based on a project developed as part of the NexaScale cloud mentorship program. The program provided hands-on guidance and training on cloud technologies, including AWS and Terraform. The project aimed to create a scalable and secure web server infrastructure using the concepts covered during the program.
I would like to express our gratitude to the NexaScale team for their support and guidance throughout this project. It has been an invaluable learning experience, and we encourage others to explore similar mentorship opportunities in their cloud journey.
Source code
Check out the source code here: aws-nginx-terraform